What is Slice-Up?
Slice-Up is what we like to call a custom g-code generator.
Concretely, it is an hybrid in between a modeling software and a slicer.
In fact you can use it to design objects (more on that later), to turn your designs into g-code, or both.
How does it work?
Slice-Up promotes a toolpath-level design approach.
It does not deal with .STL files. Instead, it works with lines: each line represent the path that your machine will follow. To create your object using Slice-Up, you must think in terms of the layers that make it up.
How can I use it?
The Slice-Up Beta is open to everyone, and you can access it here.
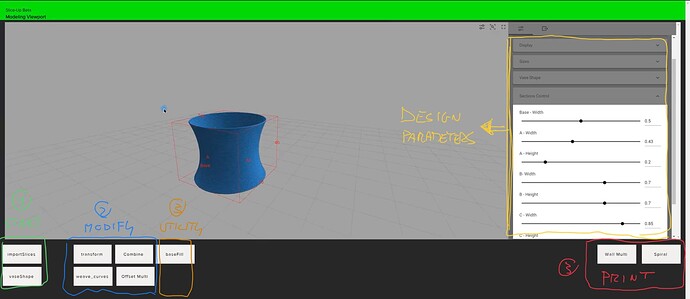
Your working area will look like this:
Slice-Up is modular
Currently, Slice-Up is made of 9 separate modules that works indipendently from each other. Most of them (all but vaseShape) do require an input, all of them require you to download an output (in the form of a .3dm model, or .gcode). Output of each modules will be used as input to the next one.
After loading a module, you make things happen interacting with the module parameters (yellow) on the right.
Following is a quick overview of all the available modules (or functionalities).
1 - Start (green)
-
vaseShape→ the easiest place to start. You can define a plethora of vase-like shapes here. -
importSlices→ advanced users can import their custom slice. You have a few constrains here: you are limited to one curve per layer (i.e. print layer) and all curves must be closed. You can choose to modify the layer height upon import, or use this module to adjust layer height of your designs later on.
2 - Modify (Blue)
-
Transform→ it applies Cartesian transformations (rotate, scale, translate) to your tool-paths, with a generative logic. Learn more about it here. -
Wave→ it applies wave logic to your designs. Learn more about it here. -
Combine→ it mixes up layers of up to three different designs. Here you can find an example of what you can achieve usingCombine+Transform. -
Offset→ Create multiple walls object starting from a single wall design.
It is worth noting two things:
- You can use modify modules in whatever order, how many times you want.
- When using this modules on a
multi-wallsobject (i.e. created using offset), you will be able to work on a single wall at the time (by selecting it).
3- Utilities (orange)
-
BaseFill→ You can create base layers for your object. It should be the last step before printing.
4- Print (red)
-
Spiral→ Produce a .gcode file after spiralzing your layers. It is the classic vase-mode, and only works on single-wall objects. -
Multi→ It generates a continuous path, according to whatever logic you define in it. It works with both.
DISCLAIMER: Setting up your g-code in Slice-Up requires a little caution and some experience. Make sure to read through here before running your first print by your machine.
TIP: In the modeling phase, you are allowed to be reckless. Go ahead and experiment, play with parameters and see what happens. Slice-Up is meant to be an intuitive tool.
Conclusion
The concept is rather novel, and documentation is scarce.
I’ll be writing more documentation in the upcoming months, but please do not hesitate to ask for clarifications. This also help me understand what is most unclear, and need to be addressed first.
